Integrations28 Sept 2026
Xcellerate OPS emits an event every time something happens: a ticket is created, a quote is accepted, an invoice is created, a call is missed. With outgoing webhooks you send those events as JSON to your own URL, so Zapier, Make, n8n, Power Automate or your own system can act on them straight away. This guide is for admins at MSPs and service businesses who want OPS to drive their other tools.
TL;DR
- Go to Settings → Data and security → Notifications and webhooks and add one URL per event.
- OPS sends one JSON
POSTper event, immediately, optionally signed with HMAC-SHA256.- Each delivery is sent once, without retries: pick a receiver that is always available and answers fast.
Before you start
- You have the admin role in your OPS workspace.
- You have an endpoint that accepts
POSTrequests withContent-Type: application/jsonand responds within 8 seconds. - The URL resolves to a public address. Private or internal addresses are refused. Prefer HTTPS.
- Optional: a shared secret so your receiver can verify the signature.
Set up an outgoing webhook
Step 1: Open the events page
Go to Settings → Data and security → Notifications and webhooks. Events are grouped by area. Event names are shown in English with their technical key, for example "Ticket created" (ticket.created).
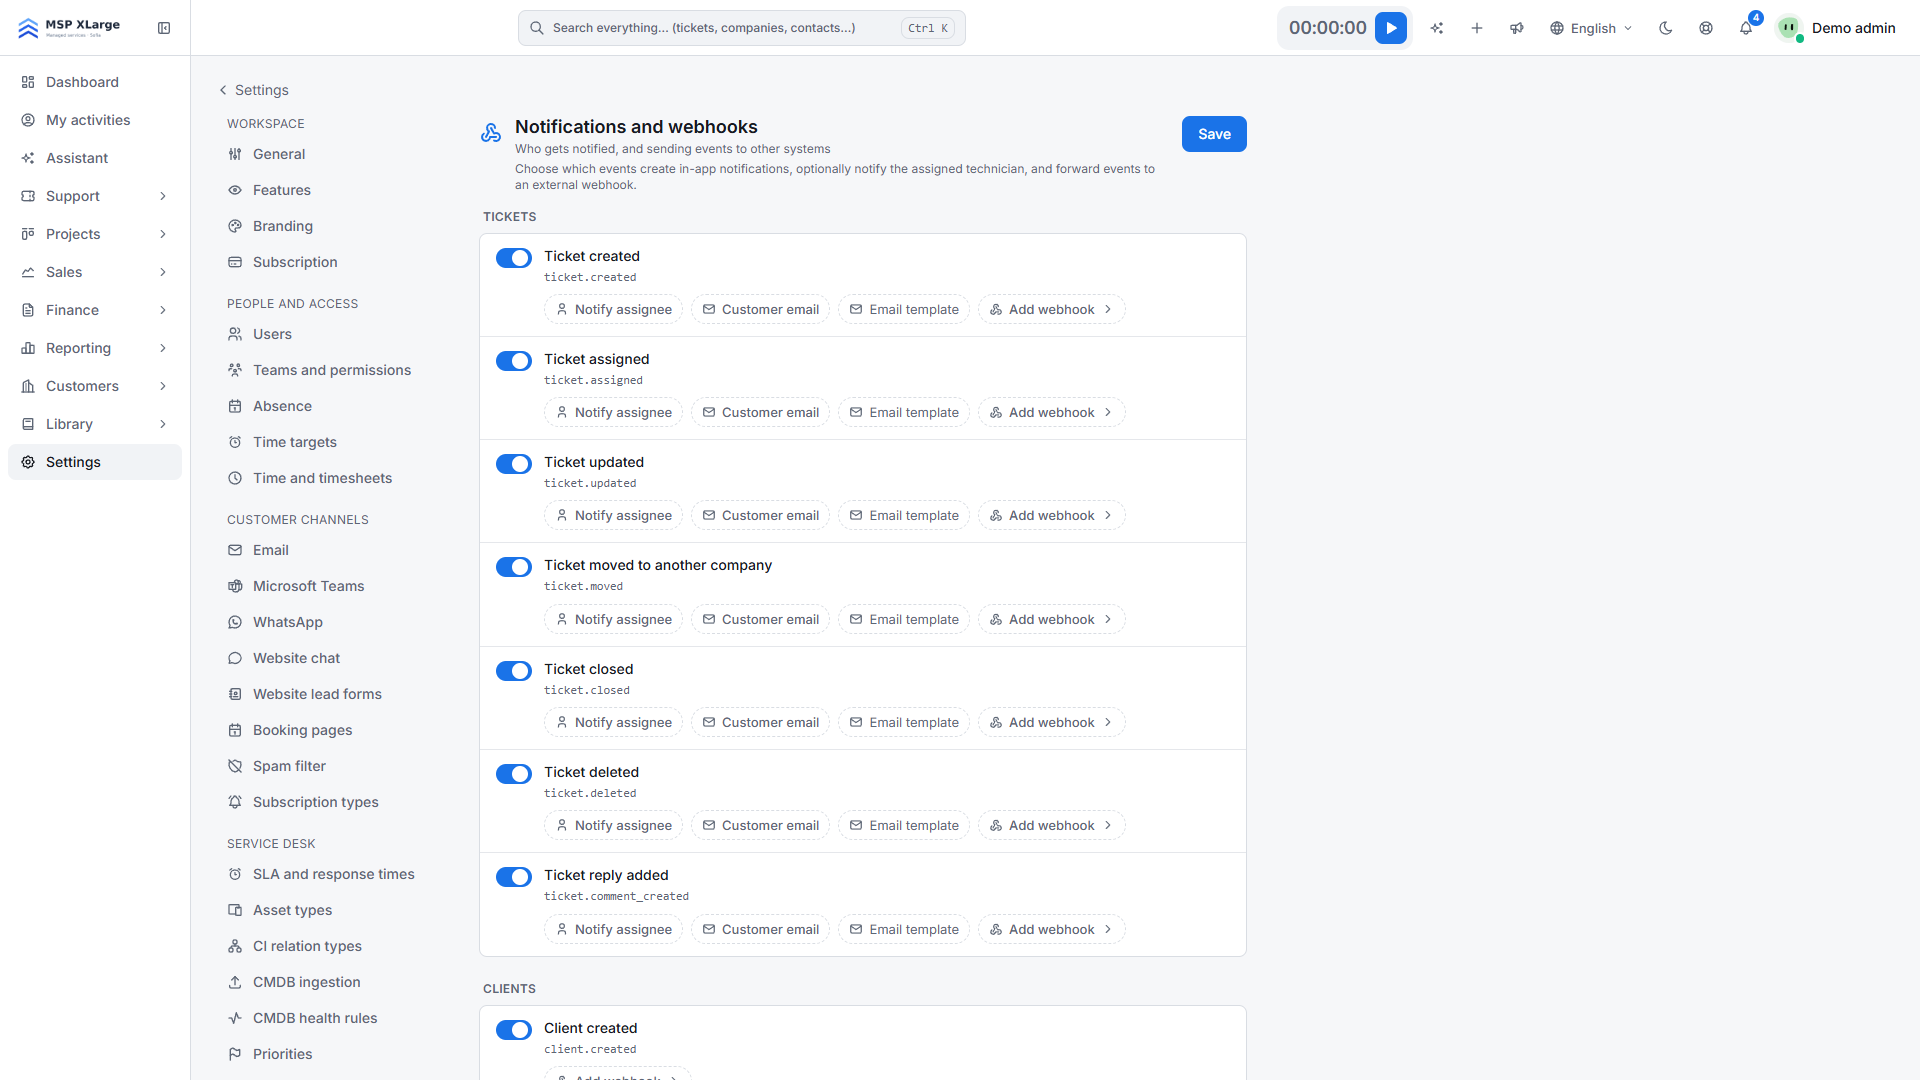 The Notifications and webhooks page, with options per event for notifying the assignee, customer email, email template and a button to add a webhook.
Step 2: Add a webhook to an event
Find the event you want to forward and click Add webhook. Enter the URL of your receiver.
Step 3: Set a signing secret (optional)
Fill in Signing secret (optional). Every request then carries the header X-Signature: sha256=<hex>: an HMAC-SHA256 of the raw JSON body, keyed with your secret. Your receiver computes the same value and compares. The secret is not shown again after saving. If you leave the field blank when you save, the stored secret is kept.
Step 4: Send a test
Click Test to send a sample payload for that event. The test only confirms that OPS could send the request. It does not tell you what your endpoint did with it. So always check on the receiving side, in your tool's history or logs, that the sample arrived and was processed correctly.
Step 5: Save and repeat
Click Save at the top of the page. Repeat for every event you want to forward: you set one URL per event type.
What happens after you connect
- Direction: from OPS to your URL. One
POSTper event, sent the moment it happens. - Content: every message has the same envelope. The
datafield differs per event.
{
  "event": "ticket.created",
  "label": "Ticket created",
  "occurredAt": "<ISO-8601>",
  "title": "…",
  "link": "/tickets/…",
  "data": { … }
}
- Coverage: over 160 event types, including tickets, clients and contacts, CRM tasks, projects, budgets, timesheets, invoices, contracts, quotes, assets, calls, opportunities, working time, ITIL changes, problems and incidents, and AI colleagues.
- Notifications: the same page also controls in-app notifications per event, Notify assignee and customer email templates for ticket events.
To see what else you can automate, have a look at automation in OPS and EU integrations and security.
Good to know
- Sent once, no retries. There is no retry and no delivery log. If your receiver is down or too slow, that event does not arrive. Use a reliable receiver: an automation platform, or your own endpoint that stores the message, answers at once and processes it afterwards.
- 8-second timeout, and redirects are not followed. Use the final URL.
- One URL per event type. To feed several systems with the same event, let your receiver fan it out.
- Bulk imports and merges never fire webhooks.
- The URL is checked again for a public address at the moment of sending.
Troubleshooting
- "Sample payload sent." The test request went out. Check on your receiver that it was also processed.
- "Webhook test failed: " A connection-level failure, such as DNS, a timeout or TLS.
- Validation error on save. The URL is invalid or resolves to a private or internal address.
- Real events do not arrive, although the test worked. Check that your endpoint responds quickly, without redirects, and is still reachable on a public address.
Get started
Want OPS to pass your tickets, quotes and invoices to the rest of your tools? Get started for free and set up your first webhook from Settings.