Connect Microsoft Entra ID to Xcellerate OPS and your team signs in with the Microsoft 365 work account they already use. Your login page gets a Microsoft sign-in button, for staff and for portal users who have an account. OPS can create the app registration in your Entra tenant with one click, or you can register the app yourself.
TL;DR
- Admins add the Microsoft SSO card under Settings → Data and security → Integrations → Authentication.
- One-click: an Entra Global Administrator signs in and OPS creates and enables the app registration. Manual: paste your own client ID and secret.
- OPS matches the Microsoft email address to an existing user. No accounts are created automatically.
Before you start
- You are an admin of your OPS workspace. Only admins can change these settings.
- For the one-click setup: someone who can sign in as a Global Administrator of your Entra tenant. Microsoft asks that person to consent to
Application.ReadWrite.All and DelegatedPermissionGrant.ReadWrite.All (delegated permissions).
- For the manual setup: access to Entra ID → App registrations in the Azure portal.
- The people who will sign in already exist as users in OPS, with the same email address as their Microsoft account.
Step 1: add the Microsoft SSO card
- Go to Settings → Data and security → Integrations.
- Drag Microsoft SSO from the catalog on the right into the Authentication category, or click it.
- The card Allow sign-in with Microsoft appears.
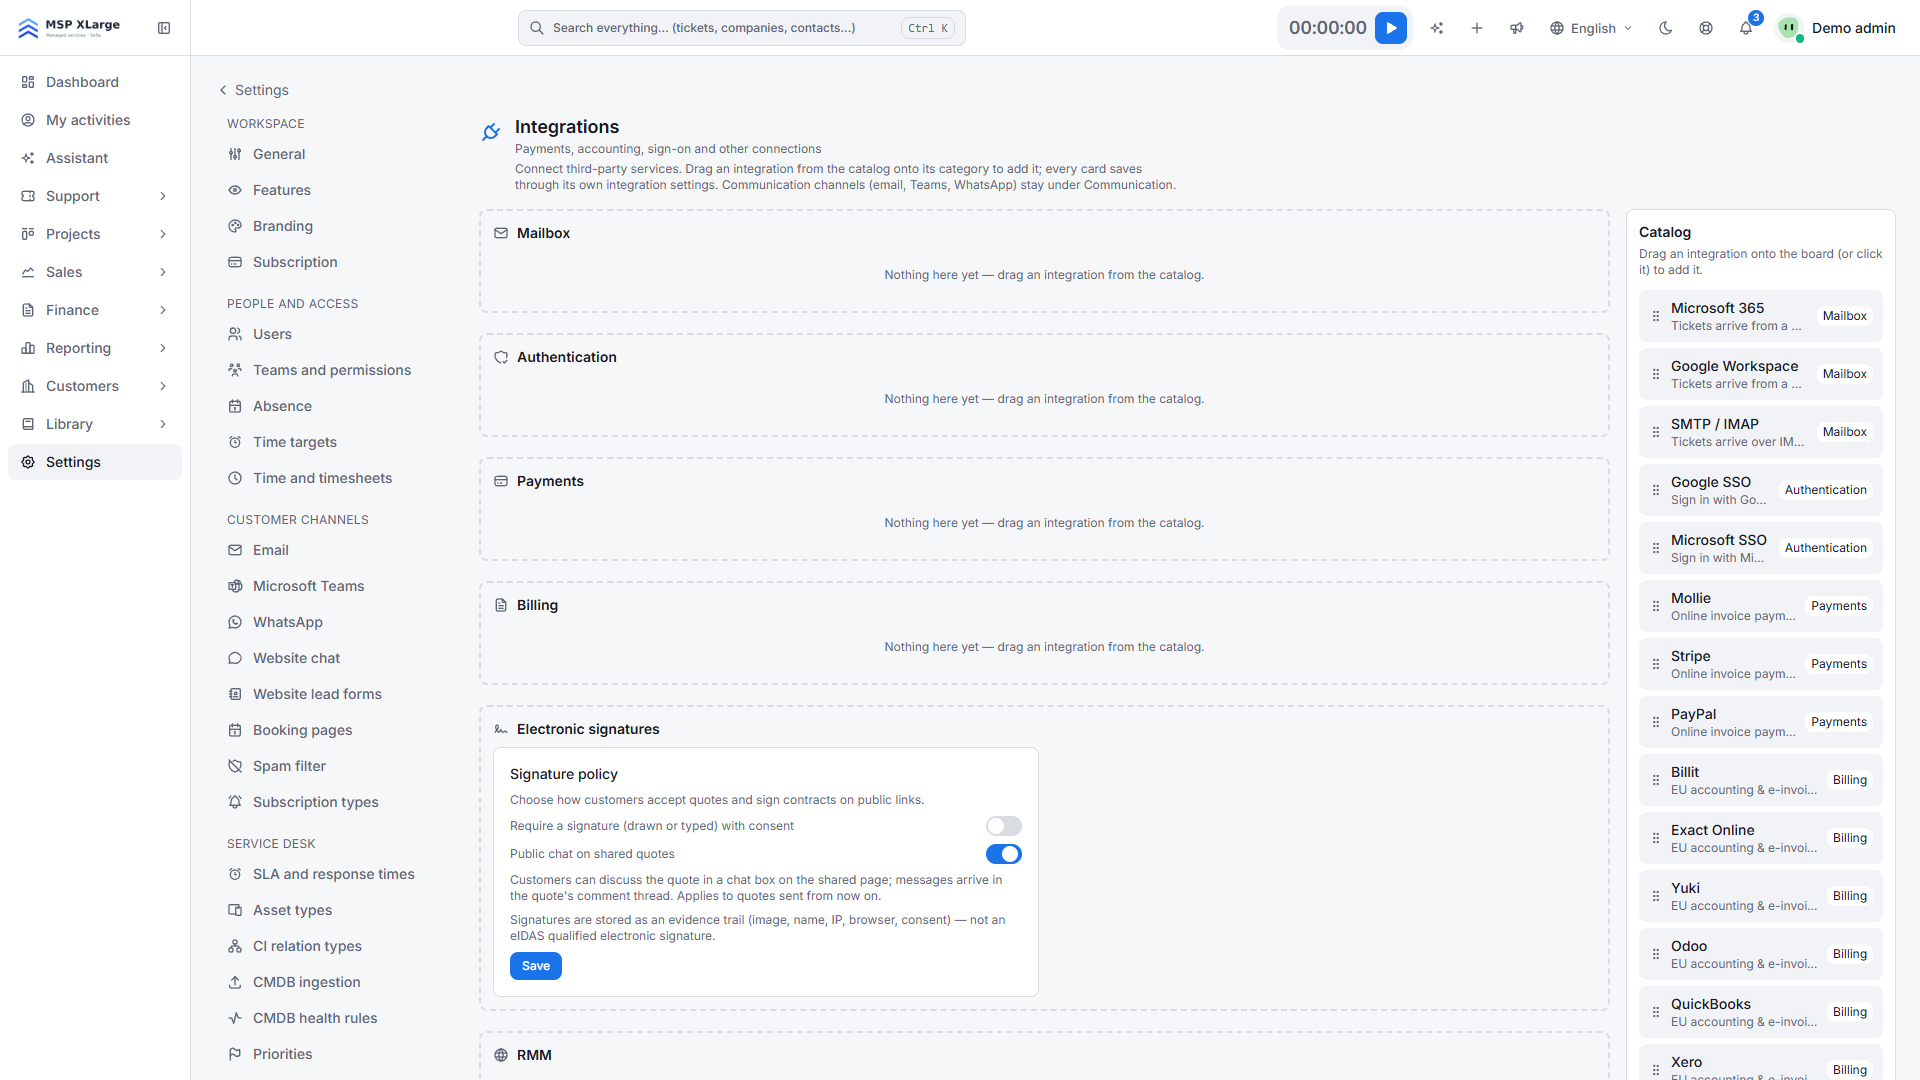 The Integrations page with empty categories (Mailbox, Authentication, Payments, Billing) and the catalog of available integrations on the right.
Step 2, option A: set up automatically (recommended)
- On the card, click Set up automatically.
- Read the dialog. OPS will create an app registration named after your workspace URL, with a client secret valid for 24 months and the correct redirect URI, and then switch SSO on.
- Click Continue to Microsoft sign-in, sign in as a Global Administrator and accept the consent.
- You return to Integrations with the message "Microsoft 365 SSO was provisioned in your Entra tenant and enabled". Microsoft sign-in works straight away.
Step 2, option B: manual app registration
- In Entra ID, register a new application with a Web redirect URI. Use the URI shown below the cards next to Register this redirect URI with each provider. It follows the pattern
https://auth.<platform-domain>/sso/microsoft/callback. One URI serves all workspaces.
- Create a client secret. Sign-in requests the scopes
openid email profile.
- On the card, paste the Application (client) ID and the Client secret.
- Switch on Enable on the login page and click Save. You see "Sign-in options saved."
Step 3 (optional): profile pictures
Once a provider is enabled, you can switch on Profile pictures from the sign-in account. It saves instantly. For Microsoft, also switch on Include Microsoft 365 pictures and click Save. Sign-in then also requests the Microsoft Graph permission User.Read. If your tenant requires admin consent, grant it on the app registration first.
What happens after you connect
- The login page shows a Microsoft button. OPS matches the Microsoft email address to an existing user in your workspace. Staff land in the app, portal users in the client portal.
- SSO counts as a strong sign-in factor, so a workspace that requires passkeys still accepts it. Read more about security and access control.
- With pictures on, OPS fetches the directory photo in the background after sign-in. It only fills a gap: an uploaded picture comes first, then Gravatar, then the Microsoft 365 photo. It never replaces a picture someone uploaded or removed, and it checks again at most every 30 days.
Good to know
- Create users in OPS first. Disabled (offboarded) users are refused.
- The one-click client secret expires after 24 months. Running Set up automatically again creates a new app registration.
- The one-click app only has consent for openid, profile and email. Microsoft 365 pictures add
User.Read, which can trigger a consent prompt or be blocked until an admin grants it.
- The Microsoft picture setting is only saved when Microsoft SSO and profile pictures are both on.
- The client secret field is write-only. Leave it blank to keep the saved secret.
- You can only remove a card after you Disable it. Removing it also clears the stored client ID and secret.
Troubleshooting
- "No account exists in this workspace for that identity." There is no active OPS user with that email address. Invite the person or check the address.
- "Your identity provider did not return an email address." The Microsoft account has no email address or UPN.
- "Sign-in could not be completed. Please try again." The sign-in took longer than 10 minutes or the code exchange failed. Start again.
- "Automatic SSO setup failed: …" Microsoft's own reason follows, for example "The sign-in was cancelled."
Get started
Want your team to sign in with the account they already use? Get started for free and set up Microsoft sign-in from Settings. See all EU integrations too.